
Drag and Drop
今年的WWDC,苹果推出了一个新的功能—Drag and Drop,通过这个功能,用户可以将数据(一张图片或者一段文字)从一个地方拖拽到另一个地方,这个操作可以在同一个APP里,也可以跨APP,非常方便。但是目前只有iPad能够完美支持,iPhone上暂时还不支持跨应用的拖拽,所有操作都被限制在同一个APP内。
看名字可以知道,Drag and Drop主要分为两部分,这两部分是相对独立的,APP可以只实现Drag或者只实现Drop,可以了两者都实现。那么接下我会分别介绍Drag、Drop以及在TableView和CollectionView下Drag and Drop实现上的差异。
一. Drag
Drag and Drop的整个流程是基于用户与View之间的交互。我们知道,如果想要为一个View添加点击事件,需要为View添加一个UITapGestureRecognizer。与之类似,如果想要让View支持Drag,需要为View添加UIDragInteraction。那么这个UIDragInteraction是什么?
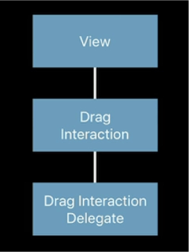
通过上面这张图我们可以看出,UIDragInteraction其实就是用户和Drag操作之间的中介,我们可以通过实现其代理方法,为Drag提供数据,或者接收整个Drag流程中各种状态的信息。因为UIDragInteraction中集成了手势,所以在实现Drag的过程中需要打开View的userInteractionEnabled属性。
下面这段代码展示了如何为一个imageView添加UIDragInteraction:

现在这个imageView已经可以支持Drag了,但是这并不表明它可以相应Drag,因为还没有实现相应的代理方法。下面我会列出所有的代理方法,分别说明都是做什么的。
1 | - (NSArray<UIDragItem *> *)dragInteraction:(UIDragInteraction *)interaction itemsForBeginningSession:(id<UIDragSession>)session; |
这个是Drag里最重要的一个方法,这个方法会为Drag提供数据,如果返回nil,那么Drag会被终止掉。
1 | - (nullable UITargetedDragPreview *)dragInteraction:(UIDragInteraction *)interaction previewForLiftingItem:(UIDragItem *)item session:(id<UIDragSession>)session; |
在Drag执行过程中,我们会看到一个View被我们拖着走,这个View是可以通过此方法进行替换的。
1 | - (void)dragInteraction:(UIDragInteraction *)interaction willAnimateLiftWithAnimator:(id<UIDragAnimating>)animator session:(id<UIDragSession>)session; |
在触发Drag时,我们需要长按View,此时我们会看到View有一个抬起的状态,在这个抬起的动画将要执行时,会触发此方法。
1 | - (void)dragInteraction:(UIDragInteraction *)interaction sessionWillBegin:(id<UIDragSession>)session; |
Drag已经被触发,准备开始拖动View的时候会触发此方法。
1 | - (BOOL)dragInteraction:(UIDragInteraction *)interaction sessionAllowsMoveOperation:(id<UIDragSession>)session; |
是否允许Drop以Move的方式响应次方法,这个方法只有在同一个APP里进行操作才会生效,因为在不同的APP里Drop只能以copy的方式来响应。这个方法默认返回YES。
1 | - (BOOL)dragInteraction:(UIDragInteraction *)interaction sessionIsRestrictedToDraggingApplication:(id<UIDragSession>)session; |
决定当前的Drag是否受限于只能被当前APP响应,默认返回NO。
1 | - (BOOL)dragInteraction:(UIDragInteraction *)interaction prefersFullSizePreviewsForSession:(id<UIDragSession>)session; |
这个方法用来告诉Drag是否需要展示全尺寸的预览图,默认返回NO,如果预览图如果太大系统会替我们进行缩放。
1 | - (void)dragInteraction:(UIDragInteraction *)interaction sessionDidMove:(id<UIDragSession>)session; |
用户的手指开始移动时会触发此方法,此时可以通过[UIDragSession locationInView:]来获取当前手指的位置。
1 | - (void)dragInteraction:(UIDragInteraction *)interaction session:(id<UIDragSession>)session willEndWithOperation:(UIDropOperation)operation; |
Drag将要执行完毕时会触发此方法。
1 | - (void)dragInteraction:(UIDragInteraction *)interaction session:(id<UIDragSession>)session didEndWithOperation:(UIDropOperation)operation; |
Drag已经执行完毕,并且结束动画已经展示完后会触发此方法。
1 | - (void)dragInteraction:(UIDragInteraction *)interaction sessionDidTransferItems:(id<UIDragSession>)session; |
Drop端如果以copy或者move来响应当前Drag时,会对数据进行转移,当转移操作完成时会触发此方法。
1 | - (NSArray<UIDragItem *> *)dragInteraction:(UIDragInteraction *)interaction itemsForAddingToSession:(id<UIDragSession>)session withTouchAtPoint:(CGPoint)point; |
这个方法允许用户继续点击View,为现有的Drag添加新的数据。
1 | - (nullable id<UIDragSession>)dragInteraction:(UIDragInteraction *)interaction sessionForAddingItems:(NSArray<id<UIDragSession>> *)sessions withTouchAtPoint:(CGPoint)point; |
因为我们可以一次拖动多个Drag出来,所以这个方法可以决定你选中的数据需要添加到哪个Drag 上。
1 | - (void)dragInteraction:(UIDragInteraction *)interaction session:(id<UIDragSession>)session willAddItems:(NSArray<UIDragItem *> *)items forInteraction:(UIDragInteraction *)addingInteraction; |
这个方法会在你点击View添加新的数据之前触发。
1 | - (nullable UITargetedDragPreview *)dragInteraction:(UIDragInteraction *)interaction previewForCancellingItem:(UIDragItem *)item withDefault:(UITargetedDragPreview *)defaultPreview; |
当一个Drag操作被取消时,我们可以通过这个方法来更改取消时的View。
1 | - (void)dragInteraction:(UIDragInteraction *)interaction item:(UIDragItem *)item willAnimateCancelWithAnimator:(id<UIDragAnimating>)animator; |
当一个Drag操作被取消时,会在执行取消动画前触发此方法。
二. Drop
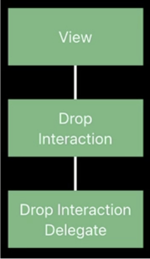
Drop是在手指松开后执行的操作,通过下面的图我们可以发现它的结构跟Drag如出一辙。同样都是为View添加Interaction,然后通过Delegate来管理整个流程。
先看下Drop的生命周期:
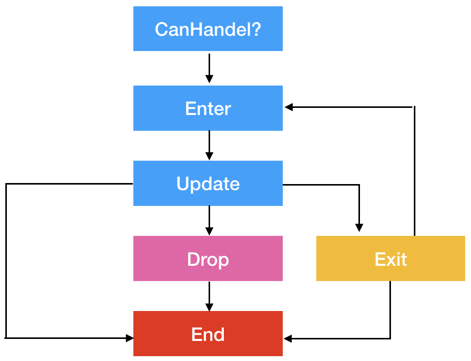
首先当数据被拖动到Drop的区域时,会通过“canHandleSession”方法询问Drop是否想响应这次Drag,如果Drop对数据不感兴趣或者不打算响应,那么这次Drag会在手指松开的时候被取消掉。如果可以响应会触发“sessionDidEnter”方法通知用户的手指已经拖动到Drop的可响应区域内。
当用户手指在Drop区域移动时会不停的触发“sessionDidUpdate”方法来询问打算通过何种方法响应Drag,如果“sessionDidUpdate”返回的是cancel,那么在松开手指时,此次Drag会被取消掉,如果返回copy或者move,那么在手指松开时会触发“performDrop”方法,这时才开始真正的对数据进行处理。
当用户手指移动到Drop区域外时会触发“sessionDidExit”方法,此时松开手指Drop是无法被响应的,当手指重新移动回Drop区域时会重新触发“sessionDidEnter”方法,继续后面的流程。
接下来我们看下UIDropInteractionDelegate下的所有方法:
1 | - (BOOL)dropInteraction:(UIDropInteraction *)interaction canHandleSession:(id<UIDropSession>)session; |
这个方法就是Drop生命周期中的第一步,返回一个BOOL值来说明对传递过来的数据是否感兴趣,如果这个方法没有被实现,那么这个方法默认返回YES。但是返回YES并不代表Drop一定会接受这个数据。
1 | - (void)dropInteraction:(UIDropInteraction *)interaction sessionDidEnter:(id<UIDropSession>)session; |
手指移动到Drop的响应区域时会触发此方法。
1 | - (UIDropProposal *)dropInteraction:(UIDropInteraction *)interaction sessionDidUpdate:(id<UIDropSession>)session; |
这个方法必须实现,它会在“sessionDidEnter”之后触发,我们需要指定其返回值“UIDropProposal”下的“operation”属性,operation有四个值,分别是:“UIDropOperationCancel”、 “UIDropOperationForbidden”、 “UIDropOperationCopy”、 “UIDropOperationMove”我们可以通过下面的图看到其对应的效果。
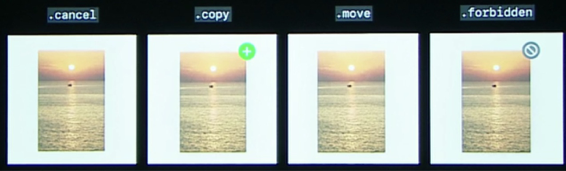
· UIDropOperationCancel:Drag会被取消掉,不会触发后续的“performDrop”方法。
· UIDropOperationCopy:数据会进行拷贝操作,但是一般用于不同APP之间的Drag and Drop,如果用户在当前位置松开手指,会触发“performDrop”方法。
· UIDropOperationMove:只有当“allowsMoveOperation”方法返回YES时,此Operation才会生效,并且按照苹果在注释中的说法,系统并没有对这个Operation赋予特殊的含义,开发者需要自己对数据源进行删除操作,同时在新的位置添加数据,好让数据看起来是移动(Move)了。- -!
· UIDropOperationForbidden:Drag会被取消掉,同时在Drop Session的右上角会有一个禁止的提示,来提醒用户当前Drop在这个位置是被禁止的。具体什么时候返回“Forbidden”由开发者自行判断,比如当一个“String”类型的数据被拖拽到一个“ImageView”里时,就可以返回“Forbidden”。
1 | - (void)dropInteraction:(UIDropInteraction *)interaction performDrop:(id<UIDropSession>)session; |
当用户在Drop的响应区域松开手指时会触发此方法,此时才开始真正的处理数据,开发者需要从“session”中通过“loadObjectsOfClass”方法解析出需要的数据,再进行展示。
1 | - (void)dropInteraction:(UIDropInteraction *)interaction concludeDrop:(id<UIDropSession>)session; |
这个方法会在Drop执行完成(包括Drop的动画)之后触发,代表Drop操作已经完成。
1 | - (void)dropInteraction:(UIDropInteraction *)interaction sessionDidExit:(id<UIDropSession>)session; |
当用户手指移出Drop的响应区域时会触发此方法。
1 | - (void)dropInteraction:(UIDropInteraction *)interaction sessionDidEnd:(id<UIDropSession>)session; |
当Drop操作彻底结束时会触发此方法,无论是成功还是失败。
1 | - (nullable UITargetedDragPreview *)dropInteraction:(UIDropInteraction *)interaction previewForDroppingItem:(UIDragItem *)item withDefault:(UITargetedDragPreview *)defaultPreview; |
当用户松开手指时,并且Drop已经被成功响应,此时会执行一段Drop的动画,这个动画的View是可以通过这个方法替换的。
1 | - (void)dropInteraction:(UIDropInteraction *)interaction item:(UIDragItem *)item willAnimateDropWithAnimator:(id<UIDragAnimating>)animator; |
当用户松开手指时,并且Drop已经被成功响应,此时会执行一段Drop的动画,在这个动画将要执行的时候会触发此方法。
三. Drag and Drop in TableView & CollectionView
在TableView和CollectionView中,Drag and Drop的使用跟刚才介绍的大致相同,但是多了一些特有的功能,那么接下来就介绍下TableView和CollectionView独有的一些功能。
1.DropIntent
DropIntent是Drop过程中在“sessionDidUpdate”方法里跟随“Operation”属性一起返回的一个属性。这个命名很不苹果,看名字根本不知道这个是用来做什么的。其实这个属性是用来确定在用户Drag数据到TableView或者CollectionView中时,cell需要做出什么动作来提示用户。
在TableView中,DropIntent有四个值:
· UITableViewDropIntentUnspecified
· UITableViewDropIntentInsertAtDestinationIndexPath
· UITableViewDropIntentInsertIntoDestinationIndexPath
· UITableViewDropIntentAutomatic
“Unspecified”表示当前手指所在的位置是不明确的,系统稍后会决定这个数据该放在哪里。
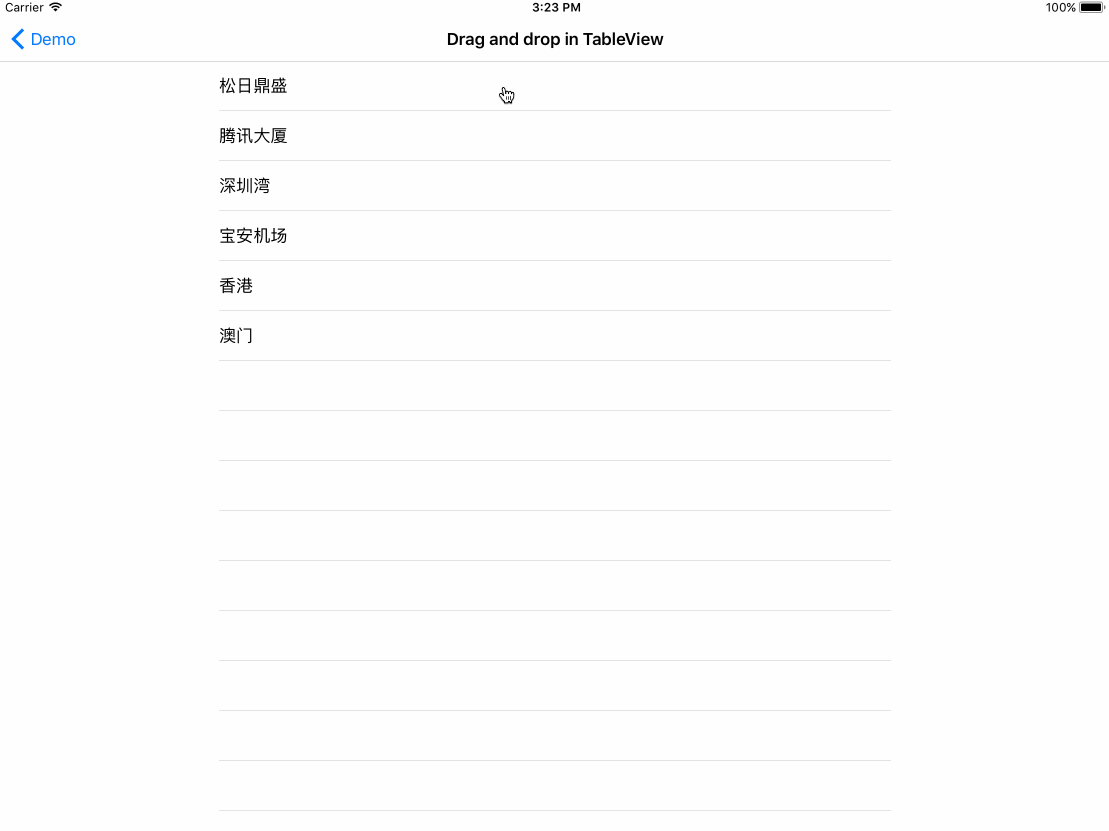
“InsertAtDestinationIndexPath”在手指移动过程中会在两个cell之间打开一个空隙,提示用户数据将要插入的位置。效果见下图:
“InsertIntoDestinationIndexPath”不会在cell间打开间隙,但是会高亮显示当前手指所在的cell,提示用户当前数据会插入到哪个cell里。效果见下图:

“Automatic”会在“InsertAtDestinationIndexPath”和“InsertIntoDestinationIndexPath” 间自己进行选择,当手指在两个cell之间时会打开一个空隙,当手指在cell里时会高亮当前cell。效果见下图:

在CollectionView中,DropIntent有三个值:
· UICollectionViewDropIntentUnspecified
· UICollectionViewDropIntentInsertAtDestinationIndexPath
· UICollectionViewDropIntentInsertIntoDestinationIndexPath
CollectionView和TableView的唯一区别就在于CollectionView没有“Automatic”这个效果,其余效果参考TableView。
2.DropPlaceholder
TableView和CollectionView另外一个特有的功能是Placeholder。当数据过大时,数据的传输需要一定的时间,当这个时间过长时我们需要给用户一个提示,系统默认会给我们展示一个提示,如下图:
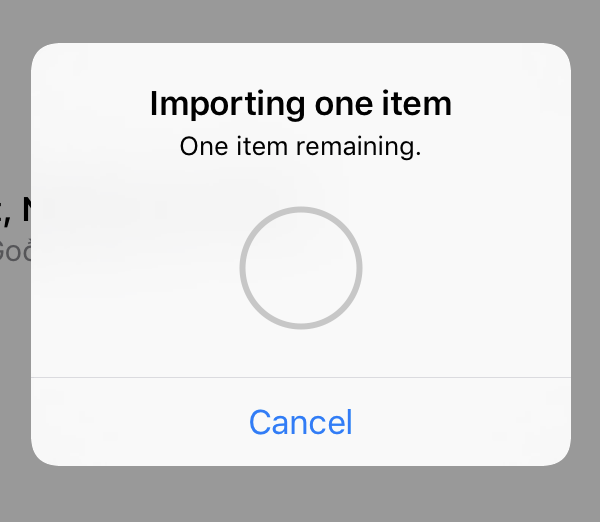
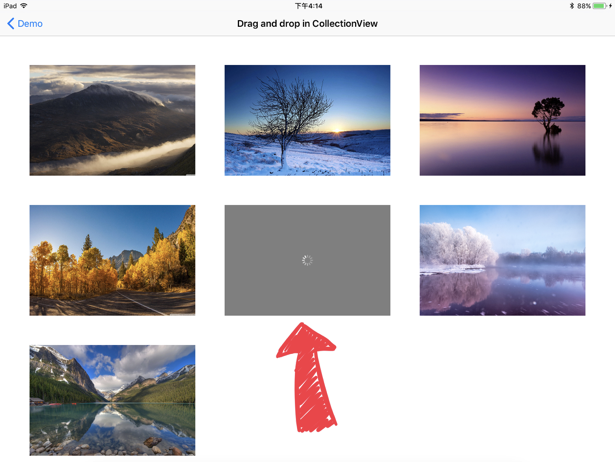
我们可以看出这个提示是以对话框形式展示的,虽然会给出进度但是这个提示太强了,用户此时只能等待,不能操作界面。所以系统给我们提供了其它方法可以替代这个弹框,这个就是Placeholder。在“performDrop”方法里,系统为我们提供了一个参数:DropCoordinator,它就是实现placeHolder的关键,在”loadObjectOfClass”前,我们先调用“DropCoordinator”下面的方法为collectionView插入一个临时的cell:
1 | - (id<UICollectionViewDropPlaceholderContext>)dropItem:(UIDragItem *)dragItem toPlaceholderInsertedAtIndexPath:(NSIndexPath *)indexPath withReuseIdentifier:(NSString *)reuseIdentifier cellUpdateHandler:(void (^)(__kindof UICollectionViewCell *))cellUpdateHandler; |
在这个cell上我们可以展示进度条或者一个loadingView。当数据加载完毕后,我们再调用“commitInsertionWithDataSourceUpdates:”方法将数据插入到数据源中,替换临时的cell。效果如下图:
最后附上Demo:Drag and Drop