
Renhua's Blog

Stay Hungry. Stay Foolish

0%

iOS--自定义转场动画

概述

在iOS7中,苹果爸爸为开发者提供了一套全新的API去实现转场动画,开发者可以通过更灵活的方式去设计动画效果。同时,iOS7还支持用手势切换VC,比如你在某个应用中push了一个新的页面,那么你可以通过在屏幕左侧向右滑动来执行返回操作。

API

实现动画的主要API:

  1. @protocol UIViewControllerContextTransitioning
  2. @protocol UIViewControllerAnimatedTransitioning
  3. @protocol UIViewControllerTransitioningDelegate

UIViewControllerContextTransitioning

这个接口在切换VC过程中为我们提供了上下文,通过它我们可以获取到执行切换时,两个VC的详细信息。在实现跳转动画的方法中,系统会为我们提供这个上下文,所以开发者并不需要去实现这个接口。

UIViewControllerAnimatedTransitioning

这个接口是在VC切换过程中起着非常重要的角色,因为它负责处理切换过程中的事件,也就是说我们要实现的动画效果等,都是在这里实现的。这里我们需要实现下面的两个方法。
-(NSTimeInterval)transitionDuration:(id < UIViewControllerContextTransitioning >)transitionContext;
返回切换过程所需要的时间。
-(void)animateTransition:(id < UIViewControllerContextTransitioning >)transitionContext;
切换时会调用此方法,动画效果都在这个方法里完成。

UIViewControllerTransitioningDelegate

对于想要执行自定义动画的VC需要实现这个接口,共有四个方法。
-(id< UIViewControllerAnimatedTransitioning >)animationControllerForPresentedController:(UIViewController *)presented presentingController:(UIViewController *)presenting sourceController:(UIViewController *)source;
跳转新页面的动画。
-(id< UIViewControllerAnimatedTransitioning >)animationControllerForDismissedController:(UIViewController *)dismissed;
当前页面消失的动画。
-(id< UIViewControllerInteractiveTransitioning >)interactionControllerForPresentation:(id < UIViewControllerAnimatedTransitioning >)animator;
手势控制页面跳转的动画。
-(id< UIViewControllerInteractiveTransitioning >)interactionControllerForDismissal:(id < UIViewControllerAnimatedTransitioning >)animator;
手势控制页面消失的动画。

Demo

第一部分

我们先来尝试着实现如下图效果的页面切换。

首先我们新建一个处理动画效果的类,这个类要实现“UIViewControllerAnimatedTransitioning”接口。
TranslationAnimateManager.h

1
2
3
4
5
6
7
8
9
10
11
12
13
14
15
16
17
18
19
20
21
22
23
24
25
26
27
28
29
30
31
32
33
34
35
36
37
38
39
40
41
42
43
44
45
46
47
48
49
50
51
52
53
54
55
56
57
58
59
60
61
62
63
64
65
66
67
68
69
70
71
72
73
74
75
76
77
78
79
80
81
82
83
84
85
86
87
88
89
90
91
92
93
94
95
96
97
98
99
100
101
102
103
104
105
106
107
108
109
110
111
112
113
114
115
116
117
118
119
120
121
122
123
124
125
126
127
128
129
130
131
132
133
134
135
136
137
138
139
140
141
142
143
144
145
146
147
148
149
150
151
152
153
154
155
156
157
158
159
160
161
162
163
typedef NS_ENUM(NSUInteger, TransitionType) {
TransitionTypePresent,
TransitionTypeDismiss
};

@interface TranslationAnimateManager : NSObject <UIViewControllerAnimatedTransitioning>

//根据定义的枚举初始化的两个方法
+ (instancetype)transitionWithTransitionType:(TransitionType)type;
- (instancetype)initWithTransitionType:(TransitionType)type;

@end

```
TranslationAnimateManager.m

``` objc
@interface TranslationAnimateManager ()

@property (nonatomic, assign) TransitionType type;

@end

@implementation TranslationAnimateManager

+ (instancetype)transitionWithTransitionType:(TransitionType)type {
static id sharedInstance = nil;
static dispatch_once_t onceToken;
dispatch_once(&onceToken, ^{
sharedInstance = [[self alloc] initWithTransitionType:type];
});
return sharedInstance;
}

- (instancetype)initWithTransitionType:(TransitionType)type {
if (self = [super init]) {
self.type = type;
}
return self;
}

- (NSTimeInterval)transitionDuration:(id<UIViewControllerContextTransitioning>)transitionContext {
return 0.5;
}

- (void)animateTransition:(id<UIViewControllerContextTransitioning>)transitionContext {
switch (self.type) {
case TransitionTypePresent:
[self presentAnimation:transitionContext];
break;

case TransitionTypeDismiss:
[self dismissAnimation:transitionContext];
break;
}
}

//实现present动画逻辑代码
- (void)presentAnimation:(id<UIViewControllerContextTransitioning>)transitionContext{
UIViewController *fromVC = [transitionContext viewControllerForKey:UITransitionContextFromViewControllerKey];
UIViewController *toVC = [transitionContext viewControllerForKey:UITransitionContextToViewControllerKey];

UIView *toView = toVC.view;
UIView *fromView = fromVC.view;
UIView *containerView = [transitionContext containerView];

UIView *toViewSnapshot = [UIView new];
toViewSnapshot.contentImage = toView.snapshotImage;
toViewSnapshot.frame = containerView.bounds;

CATransform3D scale = CATransform3DIdentity;
toViewSnapshot.layer.transform = CATransform3DScale(scale, 0.9, 0.9, 1);//
[containerView addSubview:toViewSnapshot];
[containerView sendSubviewToBack:toViewSnapshot];
CGRect upSnapshotRegion = CGRectMake(0, 0, fromView.frame.size.width, fromView.frame.size.height * 0.5);
UIView *upHandView = [UIView new];
upHandView.contentImage = fromView.snapshotImage;
upHandView.layer.contentsRect = CGRectMake(0, 0, 1, 0.5);
upHandView.frame = upSnapshotRegion;
[containerView addSubview:upHandView];

CGRect downSnapshotRegion = CGRectMake(0, fromView.frame.size.height * 0.5, fromView.frame.size.width, fromView.frame.size.height * 0.5);
UIView *downHandView = [UIView new];
downHandView.contentImage = upHandView.contentImage;
downHandView.layer.contentsRect = CGRectMake(0, 0.5, 1, 0.5);
downHandView.frame = downSnapshotRegion;
[containerView addSubview:downHandView];

fromView.hidden = YES;
[UIView animateWithDuration:0.5
delay:0.0
options:UIViewAnimationOptionCurveEaseOut
animations:^{
upHandView.frame = CGRectOffset(upHandView.frame, 0, - upHandView.frame.size.height);
downHandView.frame = CGRectOffset(downHandView.frame, 0, downHandView.frame.size.height);
toViewSnapshot.center = toView.center;
toViewSnapshot.frame = toView.frame;
} completion:^(BOOL finished) {
fromView.hidden = NO;
if ([transitionContext transitionWasCancelled]) {
[containerView addSubview:fromView];
[self removeOtherViews:fromView];
} else {
[containerView addSubview:toView];
[self removeOtherViews:toView];
}
[transitionContext completeTransition:![transitionContext transitionWasCancelled]];
}];
}
//实现dismiss动画逻辑代码
- (void)dismissAnimation:(id<UIViewControllerContextTransitioning>)transitionContext{
UIViewController *fromVC = [transitionContext viewControllerForKey:UITransitionContextFromViewControllerKey];
UIViewController *toVC = [transitionContext viewControllerForKey:UITransitionContextToViewControllerKey];
UIView *toView = toVC.view;
UIView *fromView = fromVC.view;
UIView *containerView = [transitionContext containerView];
[containerView addSubview:fromView];
toView.frame = [transitionContext finalFrameForViewController:toVC];
toView.frame = CGRectOffset(toView.frame, toView.frame.size.width, 0);
[containerView addSubview:toView];
CGRect upSnapshotRegion = CGRectMake(0, 0, fromView.frame.size.width, fromView.frame.size.height * 0.5);
UIView *upHandView = [UIView new];
upHandView.contentImage = toView.snapshotImage;
upHandView.layer.contentsRect = CGRectMake(0, 0, 1, 0.5);
upHandView.frame = upSnapshotRegion;
upHandView.frame = CGRectOffset(upHandView.frame, 0, - upHandView.frame.size.height);
[containerView addSubview:upHandView];
CGRect downSnapshotRegion = CGRectMake(0, fromView.frame.size.height * 0.5, fromView.frame.size.width, fromView.frame.size.height * 0.5);
UIView *downHandView = [UIView new];
downHandView.contentImage = upHandView.contentImage;
downHandView.layer.contentsRect = CGRectMake(0, 0.5, 1, 0.5);
downHandView.frame = downSnapshotRegion;
downHandView.frame = CGRectOffset(downHandView.frame, 0, downHandView.frame.size.height);
[containerView addSubview:downHandView];
[UIView animateWithDuration:0.5
delay:0.0
options:UIViewAnimationOptionCurveEaseOut
animations:^{
upHandView.frame = CGRectOffset(upHandView.frame, 0, upHandView.frame.size.height);
downHandView.frame = CGRectOffset(downHandView.frame, 0, - downHandView.frame.size.height);
CATransform3D scale = CATransform3DIdentity;
fromView.layer.transform = CATransform3DScale(scale, 0.9, 0.9, 1);//
} completion:^(BOOL finished) {
if ([transitionContext transitionWasCancelled]) {
[self removeOtherViews:fromView];
} else {
[self removeOtherViews:toView];
toView.frame = containerView.bounds;
}
[transitionContext completeTransition:![transitionContext transitionWasCancelled]];
}];
}

- (void)removeOtherViews:(UIView*)viewToKeep {
UIView *containerView = viewToKeep.superview;
for (UIView *view in containerView.subviews) {
if (view != viewToKeep) {
[view removeFromSuperview];
}
}
}

@end

然后我们再新建一个初始VC,就叫“FromViewController”。这个页面只需要负责点击按钮跳转即可,省下什么都不用做。

1
2
3
4
5
6
7
8
9
10
11
12
13
14
15
16
17
18
19
20
21
22
23
24
@interface FromViewController ()
@property (nonatomic, strong) ToViewController *toVC;
@end

@implementation FromViewController


- (void)viewDidLoad {
[super viewDidLoad];
self.view.backgroundColor = [UIColor brownColor];

UIButton *button = [[UIButton alloc] initWithFrame:CGRectMake(self.view.bounds.size.width / 2 - 50, self.view.bounds.size.height / 2 - 15, 100, 30)];
[button setTitle:@"点我跳转" forState:UIControlStateNormal];
[button setBackgroundColor:[UIColor blackColor]];
[button addTarget:self action:@selector(buttonClick) forControlEvents:UIControlEventTouchUpInside];
button.layer.cornerRadius = 15;
[self.view addSubview:button];
}

- (void)buttonClick {
self.toVC = [[ToViewController alloc] init];
[self presentViewController:self.toVC animated:YES completion:nil];
}

接下来我们再创建一个新的页面叫做“ToViewController”,是跳转后的界面,因为要实现自定的跳转动画,所以这个页面要实现“UIViewControllerTransitioningDelegate”接口。

@interface ToViewController ()<UIViewControllerTransitioningDelegate>

@end

@implementation ToViewController

- (id)init {
    if (self = [super init]) {
    }
    return self;
}

- (void)viewDidLoad {
    [super viewDidLoad];
    self.transitioningDelegate = self;
    self.modalPresentationStyle = UIModalPresentationCustom;
    self.view.backgroundColor = [UIColor grayColor];
    
    UIButton *button = [[UIButton alloc] initWithFrame:CGRectMake(self.view.bounds.size.width / 2 - 50, self.view.bounds.size.height / 2 - 15, 100, 30)];
    [button setTitle:@"点我回退" forState:UIControlStateNormal];
    [button setBackgroundColor:[UIColor blackColor]];
    [button addTarget:self action:@selector(buttonClick) forControlEvents:UIControlEventTouchUpInside];
    button.layer.cornerRadius = 15;
    [self.view addSubview:button];
}

- (void)buttonClick {
    [self dismissViewControllerAnimated:YES completion:nil];
}

- (id <UIViewControllerAnimatedTransitioning>)animationControllerForPresentedController:(UIViewController *)presented presentingController:(UIViewController *)presenting sourceController:(UIViewController *)source {
    return [TranslationAnimateManager transitionWithTransitionType:TransitionTypePresent];
}

- (id<UIViewControllerAnimatedTransitioning>)animationControllerForDismissedController:(UIViewController *)dismissed{
    //这里我们初始化dismissType
    return [[TranslationAnimateManager alloc ]initWithTransitionType:TransitionTypeDismiss];
}

至此,我们就完成了第一部分自定义跳转动画,赶快运行起来试试吧~

第二部分

现在我们点击按钮可以让页面按照我们写好的动画跳转到下一个页面,但是还有一个手势控制我们没有实现,利用手势控制我们可以实现更加友好的界面操作。
我们再创建一个类,继承自“UIPercentDrivenInteractiveTransition”,用来监听我们的手势操作。

@interface SwipeInteractiveTransition ()

@property (nonatomic, assign) BOOL shouldComplete;
@property (nonatomic, strong) UIViewController *presentingVC;
@property (nonatomic, strong) UIViewController *targetVC;

@end

@implementation SwipeInteractiveTransition

+ (instancetype)sharedInstance {
    static id sharedInstance = nil;
    static dispatch_once_t onceToken;
    dispatch_once(&onceToken, ^{
        sharedInstance = [[self alloc] init];
    });
    return sharedInstance;
}

-(void)wireToViewController:(UIViewController *)viewController
{
    self.presentingVC = viewController;
    [self prepareGestureRecognizerInView:viewController.view];
}

- (void)writeTargetViewController:(UIViewController *)viewController {
    self.targetVC = viewController;
}

- (void)prepareGestureRecognizerInView:(UIView*)view {
    UIPanGestureRecognizer *gesture = [[UIPanGestureRecognizer alloc] initWithTarget:self action:@selector(handleGesture:)];
    [view addGestureRecognizer:gesture];
}

-(CGFloat)completionSpeed
{
    return 1 - self.percentComplete;
}

- (void)handleGesture:(UIPanGestureRecognizer *)gestureRecognizer {
    CGPoint translation = [gestureRecognizer translationInView:gestureRecognizer.view.superview];
    switch (gestureRecognizer.state) {
        case UIGestureRecognizerStateBegan: {
            self.interacting = YES;
            self.targetVC = [[ToViewController alloc] init];
            [self.presentingVC presentViewController:self.targetVC animated:YES completion:nil];
        }
            break;
        case UIGestureRecognizerStateChanged: {
            NSInteger y =  translation.y;
            CGFloat fraction = y / 200.0;
            fraction = fminf(fmaxf(fraction, 0.0), 1.0);
            self.shouldComplete = (fraction > 0.1);
            
            [self updateInteractiveTransition:fraction];
            break;
        }
        case UIGestureRecognizerStateEnded:
        case UIGestureRecognizerStateCancelled: {
            self.interacting = NO;
            if (!self.shouldComplete || gestureRecognizer.state == UIGestureRecognizerStateCancelled) {
                [self cancelInteractiveTransition];
            } else {
                [self finishInteractiveTransition];
            }
            break;
        }
        default:
            break;
    }
}

@end

然后在“FromViewController”中,我们添加如下代码注册手势监听:

self.toVC = [[ToViewController alloc] init];
SwipeInteractiveTransition *swipeInteractiveTransition = [SwipeInteractiveTransition sharedInstance];
[swipeInteractiveTransition wireToViewController:self];
[swipeInteractiveTransition writeTargetViewController:self.toVC];

在“ToViewController”中,我们要实现下面的方法:

-(id<UIViewControllerInteractiveTransitioning>)interactionControllerForPresentation:(id<UIViewControllerAnimatedTransitioning>)animator {
    return [SwipeInteractiveTransition sharedInstance].interacting ? [SwipeInteractiveTransition sharedInstance] : nil;
}

如果没有手势触发或者手势触发失败,这个方法会返回空,此时系统会自动调用- (id <UIViewControllerAnimatedTransitioning>)animationControllerForPresentedController:(UIViewController *)presented presentingController:(UIViewController *)presenting sourceController:(UIViewController *)source这个方法去执行跳转动画。
我们看下完成后的效果。
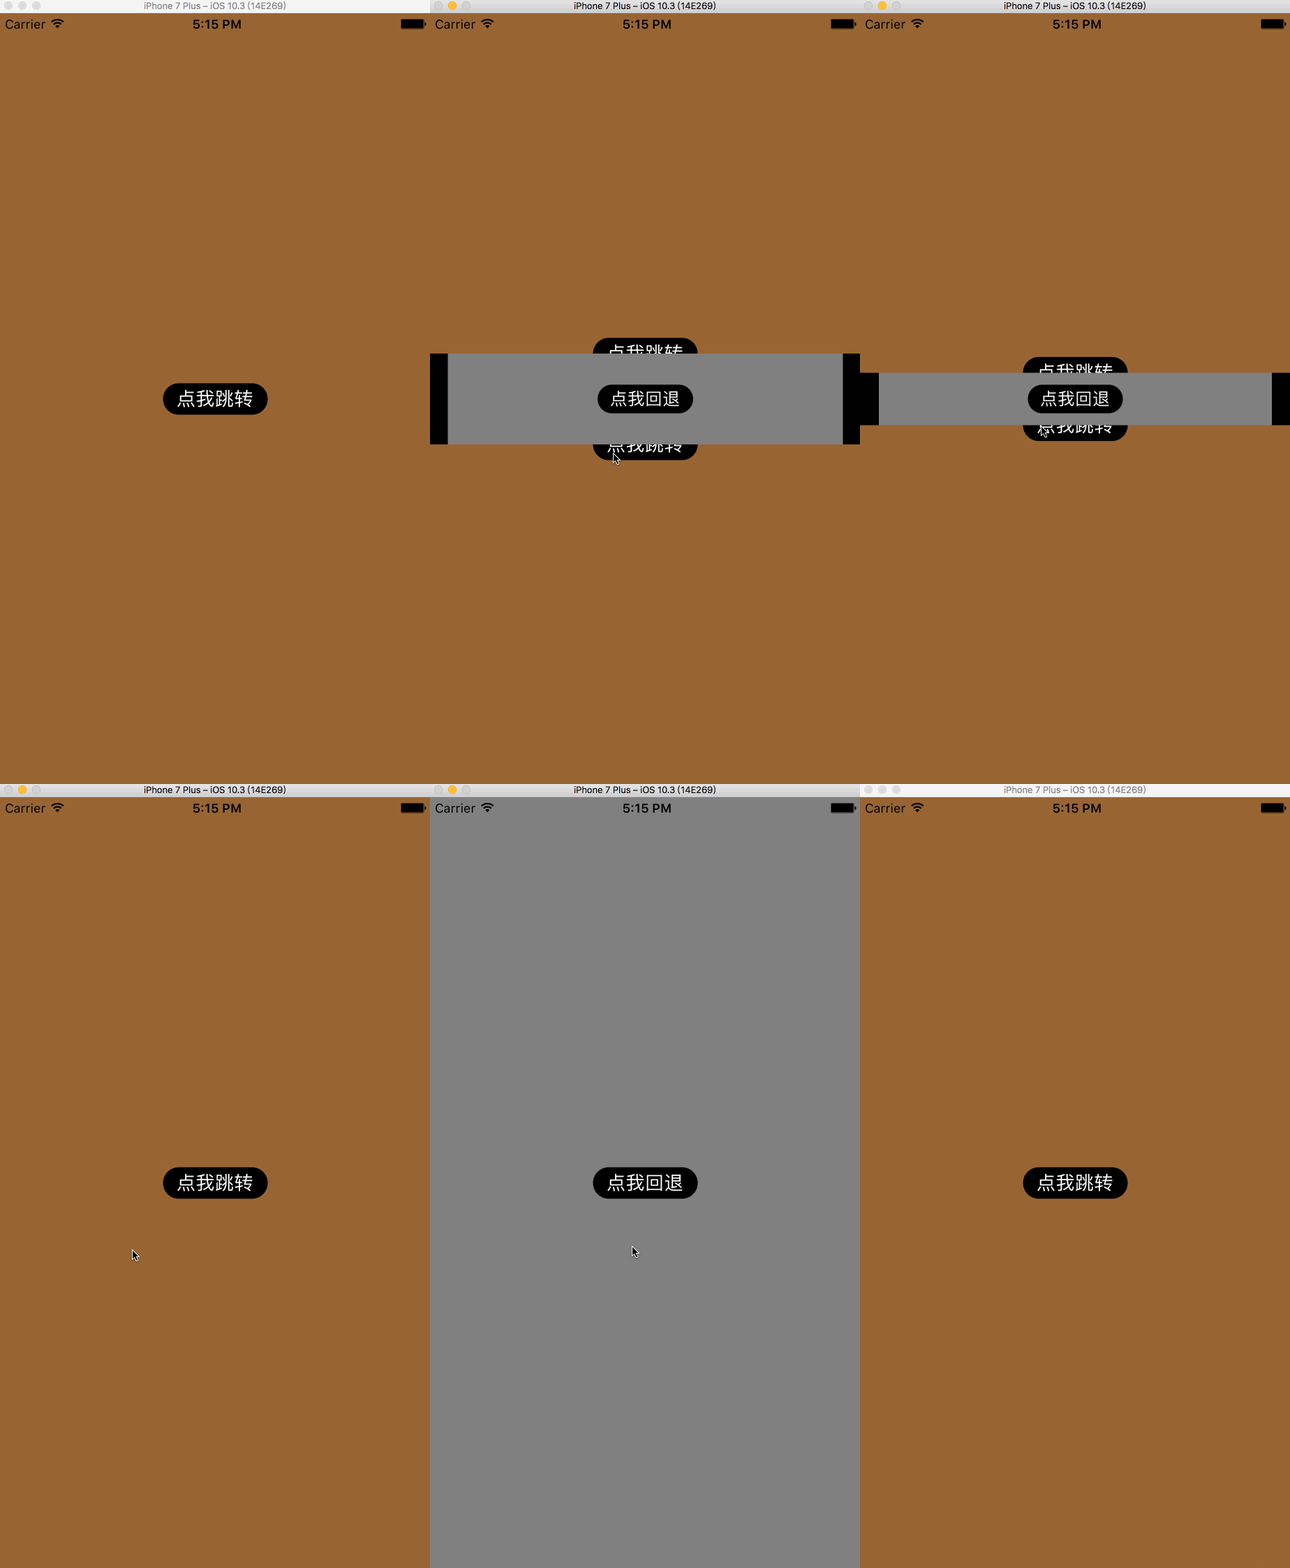
看着还是很nice的。其实苹果为我们提供的动画接口还是很强大的,如果利用好了可以做出很多酷炫的效果和新颖的交互。